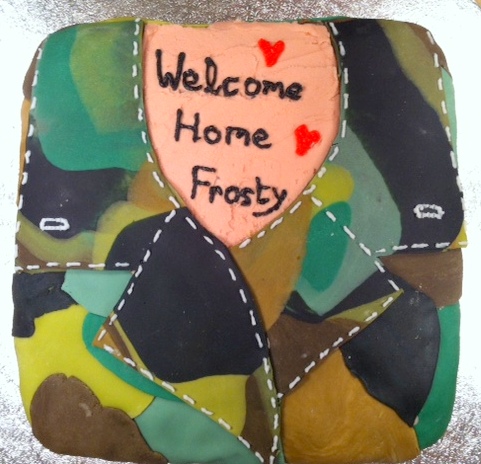
As I tweeted last week, my hubby is returning home from overseas so I decided to make him a welcome home cake! Now I must first explain that his nickname is Frosty. Some of you may have seen the suggestions on my Facebook page to make him a Frosty The Snowman cake but even though it looks like we woke up in Oct outside, I just couldn't bring myself to do a Christmas theme cake in August!!!
So I began by making the normal Madeira cake mixture (10oz Butter, 10oz Flour, 10oz Sugar & 5 Eggs) and divided the mix between two 8-inch square tins and chucked them in the oven for approx 20mins. Whilst these were rising to perfection I began to create some of the different colour greens I needed to make camouflage icing. I had loads of blue icing left over from my Batman cake below, so thinking back to my primary school days, I remembered I needed to add some yellow colouring to get my green.
Remember you'd be sitting there in class, half listening to the teacher going on about times tables, or potted plants or something, when next she'd announce it was arts and crafts time!!!!! Sweeeet! Get the bib on me Miss, because this is going to get fierce messy.
So back to the colour making. For inspiration I hung one of his uniforms over the door in the kitchen so I could get all the different shades of green as real as possible (not a stoopid as I look). I also had yellow left over from Batman, so I added blue to this to make a shade of green. Now the big challenge was the army shirt had lots of browns in it. To make brown I needed to blend yellow, red and blue, which started out like something out of Rainbow Bright. After much kneading, and reaching the early stages of Carpel Tunnel Syndrome, I eventually got it to a khaki brown. Going from light brown to dark brown proved very difficult indeed. I added black, and it looked like human excrement, and I added yellow and it was nion green. So it was a chapter of 50 Shades of Green after a while but managed to get a few different version of green going on!!
I had seen a clip on Youtube on how to create a marble effect with blending two blocks of coloured icing together. I decided not chance this on the whole lot of my icing in case I made a total hames of it, so I just did this for a piece I was going to make in to a collar.
I proceeded to make up some butter icing and initially thought I would make it a khaki colour for the overall cake and place the different colour greens around it. So I made a cup of drinking chocolate to give that caramellie colour but that went pear shaped fairly lively!!! It made the butter cream very watery and not caramellie at all (the cheek of it). Another plan foiled! So decided to use the same concept for creating a brown colour; by adding red, yellow and blue colouring to the butter cream. So ya............this didn't go so well. Basically as soon as the yellow and red went in, it turned to pinkish. Then BRAINWAVE!!!!! I could use this as skin under the army shirt that I was going to create. I'm a frickin' genius.
I sandwiched together the two cakes with my newly invented genius skin colour butter cream and covered all around the cake with it as well. I figured that butter cream would offer a better sticking base for the fondant icing than jam (i'm seriously coming out with all sorts of genius ideas here, I amaze myself sometimes!). Now the entire cake is covered in "skin icing", then I take all the different shades of green and roll out little segments to place scattered on the cake, giving that camo effect. For the collar, I lined up rolls of all the different shades of green (as seen on Youtube clip) and twisted them around each other. I rolled them flat, then twisted them again, and then rolled it flat again.........you get the drift.....until you see the different coloured icing's edged blend in to each other. On reflection this would have worked perfectly for the whole cake, but hindsight is 50:50 as a friend of mine says!!
The finishing touches were the teenchie bits of white icing to make it look like stitching all around the collar, and of course my junior infants handwriting scrawled on the chesticle area!!!! And here's to another creation/attempt/fluke.................
You can see few more of these pics on my Facebook page. If you like then "like" the page.

